Setting up to integrate and export to ADP RUN
This topic includes:
- How to Install the Integration/Export
- How to Export PayClock Online Payroll Data
- How to Read the Output File
How to Install the Integration for ADP RUN
- In PayClock Online, go to Exports > Manage Exports.
- Click New, in the list find ADP RUN.
- From Add New Payroll Export select Setup Payroll Export.
- Select the pay class(s) to include in the integration and click Next. Note: For multiple pay classes the pay period start and end dates must be the same or the export will have to be done by Date Range.
- Enter a nickname and click Next.
- Under Required Information enter the ADP Code as provided by ADP. Note: This could also be referred to as the IID number.
- Choose the Pay Frequency, and which Employee Identifier was used when you set up ADP RUN.
- Under Department Settings select Include Department and/or Group By Worked Department if you require the employee data in that format, click Next.
- Select the pay codes to map/include in the export and enter the Payroll Pay Type as provided by ADP, click Next.
- If Group By Worked Department was selected set the Department Code Mapping, click Next.
- Verify the configuration and click Save to complete the integration.
- The ADP Run integration will show in the list.
How to Export PayClock Online Payroll Data to ADP RUN
- In PayClock Online click on Exports, select the export from the list.
- At the export window, select a pay period or date range.
- Click Export Data and save the file.
- Log into ADP Run and go to Payroll Home > Time Sheet Import.
- On the Pay Data Import page, click Browse, and navigate to the export file.
- Click Import Pay Data.
- On the Pay Data Approval page, review the time sheet import data.
- Click Approve to open the Payroll Worksheet for this payroll.
- Make any needed changes and continue processing the payroll.
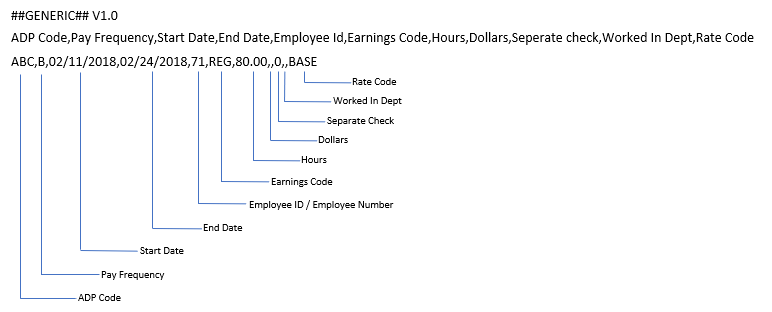
How to Read the Output File for ADP RUN
- First row – Must contain a version number.
- Second Row – Contains the column heading.
- Third Row and subsequent rows – Contains payroll data.
File Layout:
- Company Code
- Pay Frequency
- Pay Period Start
- Pay Period End
- Employee ID or Employee Time Clock ID
- Earnings Code
- Pay Hours
- Dollars
- Separate Check
- Worked Department
- Rate Code

Mon 12/08/2025

